


Setting up a robust CI/CD pipeline is crucial for ensuring high-quality deployments. In this post, I’ll walk you through how I set up SonarQube on an EC2 instance and seamlessly integrated it with CircleCI for our GKE deployments. This integration not only improves code quality but also automates the process of checking for potential issues before deploying to Kubernetes.
Setting Up SonarQube on EC2
The first step was to deploy SonarQube on an EC2 instance. This provided a dedicated environment for analyzing our code. The setup was straightforward, involving installation of Docker, pulling the SonarQube image, and running it on the instance. With SonarQube up and running, we had a powerful tool to identify code smells, bugs, and security vulnerabilities.
Configuring SonarQube in CircleCI
Next, I configured our CircleCI pipeline to use SonarQube for code analysis. By adding SonarScanner to our build jobs, every commit is now automatically analyzed. CircleCI fetches the SonarQube report and ensures our code meets the required quality gates before proceeding with the deployment to GKE.
Automated Quality Checks for GKE
With this setup, every code change undergoes rigorous quality checks. CircleCI leverages SonarQube to detect issues early, providing developers with instant feedback. Once the code passes the quality gates, it’s deployed to our GKE cluster, ensuring only high-quality code makes it to production.
Deploy sonarqube on EC2 ubuntu
Edit the system configuration file.
sudo vi /etc/sysctl.conf
Insert the following lines at the end of this file.
vm.max_map_count=262144
fs.file-max=65536
Enable the system configuration.
sudo sysctl -p
Create a configuration file named 99-sonarqube.conf.
sudo vi /etc/security/limits.d/99-sonarqube.conf
Here is the file content.
root   -   nofile   65536
root   -   nproc7610
Reboot the Server.
sudo reboot
Install the Docker service.
sudo apt-get update
sudo apt-get install docker.io
Download the SonarQube Docker image from the online repository.
sudo docker pull sonarqube
Create Docker volumes to store the SonarQube persistent data.
sudo docker chmod 777 /var/run/docker.sock
Run these commands
docker volume create sonarqube-conf
docker volume create sonarqube-data
docker volume create sonarqube-logs
docker volume create sonarqube-extensions
Verify the persistent data directories.
docker volume inspect sonarqube-conf
docker volume inspect sonarqube-data
docker volume inspect sonarqube-logs
docker volume inspect sonarqube-extensions
Optionally, create symbolic links to an easier access location.
sudo mkdir /sonarqube
ln -s /var/lib/docker/volumes/sonarqube-conf/_data /sonarqube/conf
ln -s /var/lib/docker/volumes/sonarqube-data/_data /sonarqube/data
ln -s /var/lib/docker/volumes/sonarqube-logs/_data /sonarqube/logs
ln -s /var/lib/docker/volumes/sonarqube-extensions/_data /sonarqube/extensions
Start a SonarQube container with persistent data storage.
docker run -d --name sonarqube -p 9000:9000 -p 9092:9092 -v sonarqube-conf:/opt/sonarqube/conf -v sonarqube-data:/opt/sonarqube/data -v sonarqube-logs:/opt/sonarqube/logs -v sonarqube-extensions:/opt/sonarqube/extensions sonarqube
By default ID and Password is admin and admin
It will ask you to change the password
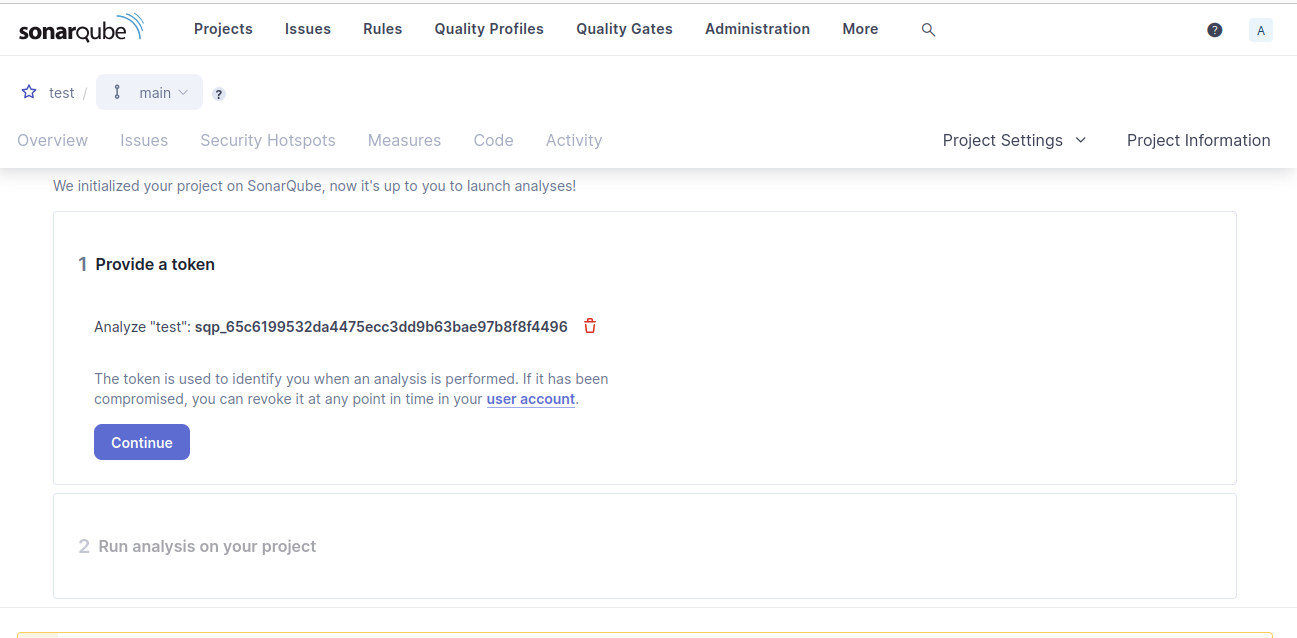
Create a local project

It will generate an project-key and token

Click to Create Project
Then clicked to Other CI

You can use the existing token or you can create new but project-key should be different for every project

I am creating new token here and click to continue.
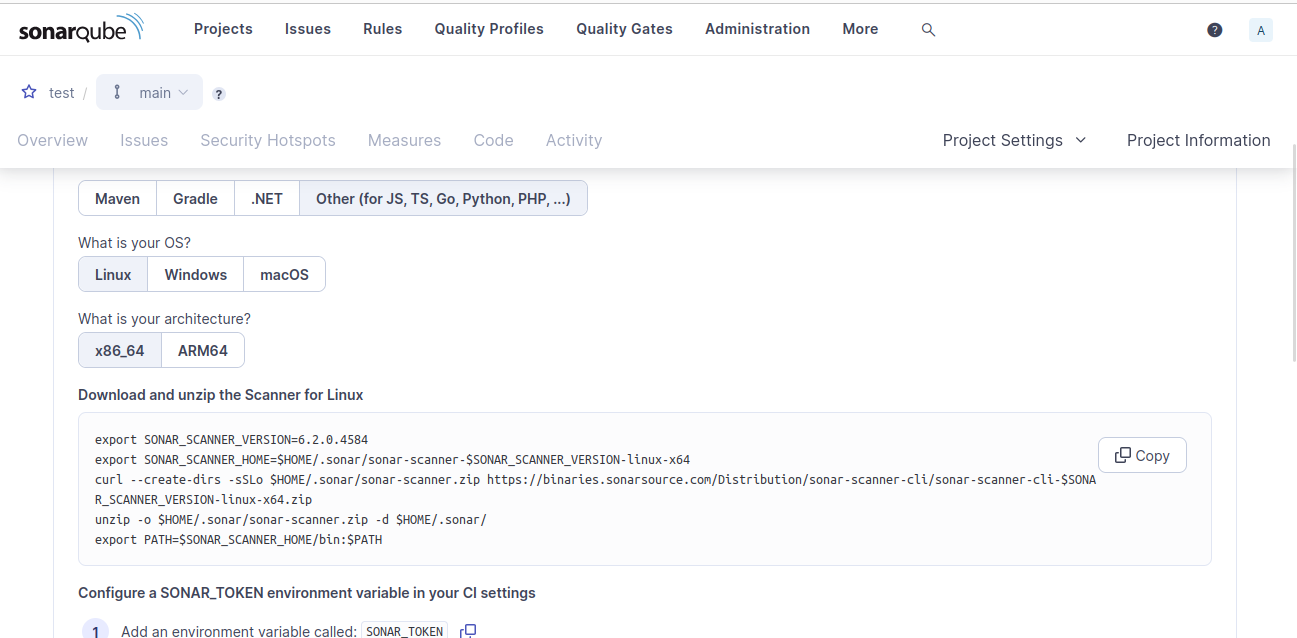
Click to Other

Use this command in your pipeline script

For you reference I am mentioning the complete script of the circleci for this project in which sonarqube part is mentioned
Need to add environment in the circle SONAR_TOKEN
version: 2.1

executors:
  docker-executor:
    docker:
      - image: cimg/base:stable
    working_directory: ~/repo
    resource_class: small

jobs:
  checkout:
    executor: docker-executor
    steps:
      - checkout
      - setup_remote_docker:
          docker_layer_caching: true

  build:
    executor: docker-executor
    steps:
      - checkout
      - setup_remote_docker:
          docker_layer_caching: true
      - run:
          name: Install Dependencies
          command: |
            sudo apt-get update && sudo apt-get install -y curl unzip
      - run:
          name: Set Environment Variable for GKE Auth Plugin
          command: |
            echo "export USE_GKE_GCLOUD_AUTH_PLUGIN=True" >> $BASH_ENV
            source $BASH_ENV
      - run:
          name: Install kubectl
          command: |
            curl -LO "https://dl.k8s.io/release/v1.26.4/bin/linux/amd64/kubectl"
            chmod +x ./kubectl
            sudo mv ./kubectl /usr/local/bin/kubectl
            kubectl version --client
      - run:
          name: Add SSH Key and Known Hosts
          command: |
            mkdir -p ~/.ssh
            echo "$SSH_PRIVATE_KEY" > ~/.ssh/id_rsa
            chmod 600 ~/.ssh/id_rsa
            ssh-keyscan $SSH_HOST >> ~/.ssh/known_hosts
      - run:
          name: Build Docker Image
          command: |
            IMAGE="asia-south1-docker.pkg.dev/dev-dev/dev-dev/kadam-be-dev"
            TAG="${CIRCLE_BUILD_NUM}"
            docker build -t ${IMAGE}:latest .
            docker tag ${IMAGE}:latest ${IMAGE}:${TAG}
      - run:
          name: Install Google Cloud SDK and gke-gcloud-auth-plugin
          command: |
            curl -L -o google-cloud-sdk-linux-x86_64.tar.gz https://dl.google.com/dl/cloudsdk/channels/rapid/downloads/google-cloud-sdk-457.0.0-linux-x86_64.tar.gz
            tar -xzf google-cloud-sdk-linux-x86_64.tar.gz -C /tmp
            /tmp/google-cloud-sdk/install.sh --quiet
            echo 'export PATH=$PATH:/tmp/google-cloud-sdk/bin' >> $BASH_ENV
            source $BASH_ENV
            gcloud components install gke-gcloud-auth-plugin --quiet
            gcloud version
      - run:
          name: Authenticate with Google Cloud
          command: |
            echo "$GCLOUD_SERVICE_KEY" > ${HOME}/gcloud-service-key.json
            gcloud auth activate-service-account --key-file=${HOME}/gcloud-service-key.json
            gcloud auth configure-docker asia-south1-docker.pkg.dev --quiet
            gcloud container clusters get-credentials dev-dev --zone asia-south1 --project dev-dev
            rm ${HOME}/gcloud-service-key.json
      - run:
          name: Push Docker Image to Artifact Registry
          command: |
            IMAGE="asia-south1-docker.pkg.dev/dev-dev/dev-dev/kadam-be-dev"
            TAG="${CIRCLE_BUILD_NUM}"
            docker push ${IMAGE}:latest
            docker push ${IMAGE}:${TAG}

  sonar-scan:
    executor: docker-executor
    steps:
      - checkout
      - run:
          name: Install SonarScanner
          command: |
            export SONAR_SCANNER_VERSION=6.2.0.4584
            export SONAR_SCANNER_HOME=$HOME/.sonar/sonar-scanner-$SONAR_SCANNER_VERSION-linux-x64
            curl --create-dirs -sSLo $HOME/.sonar/sonar-scanner.zip https://binaries.sonarsource.com/Distribution/sonar-scanner-cli/sonar-scanner-cli-$SONAR_SCANNER_VERSION-linux-x64.zip
            unzip -o $HOME/.sonar/sonar-scanner.zip -d $HOME/.sonar/
            echo "export PATH=$SONAR_SCANNER_HOME/bin:\$PATH" >> $BASH_ENV
            source $BASH_ENV
      - run:
          name: Run SonarQube Analysis
          command: |
            sonar-scanner \
              -Dsonar.projectKey=kadam \
              -Dsonar.sources=. \
              -Dsonar.host.url=http://3.84.58.196:9000 \
              -Dsonar.login=${SONAR_TOKEN}
      - run:
          name: Wait for SonarQube Quality Gate
          command: |
            timeout 5m {
              def qg = waitForQualityGate()
              if (qg.status != 'OK') {
                error "Pipeline aborted due to quality gate failure: ${qg.status}"
              }
            }

  deploy-to-gke:
    executor: docker-executor
    steps:
      - checkout
      - setup_remote_docker:
          docker_layer_caching: true
      - run:
          name: Install Dependencies
          command: |
            sudo apt-get update && sudo apt-get install -y curl unzip
      - run:
          name: Install kubectl
          command: |
            curl -LO "https://dl.k8s.io/release/v1.26.4/bin/linux/amd64/kubectl"
            chmod +x ./kubectl
            sudo mv ./kubectl /usr/local/bin/kubectl
            kubectl version --client
      - run:
          name: Add SSH Key and Known Hosts
          command: |
            mkdir -p ~/.ssh
            echo "$SSH_PRIVATE_KEY" > ~/.ssh/id_rsa
            chmod 600 ~/.ssh/id_rsa
            ssh-keyscan $SSH_HOST >> ~/.ssh/known_hosts
      - run:
          name: Deploy to GKE
          command: |
            IMAGE="asia-south1-docker.pkg.dev/dev-dev/dev-dev/kadam-be-dev"
            TAG="${CIRCLE_BUILD_NUM}"
            DEPLOYMENT_NAME="kadam-be"
            CONTAINER_NAME="kadam-be-container"
            NAMESPACE="kadam-dev"
            ssh $SSH_USER@$SSH_HOST "export KUBECONFIG='/home/$SSH_USER/.kube/config'; \
            kubectl set image deployment/${DEPLOYMENT_NAME} ${CONTAINER_NAME}=${IMAGE}:${TAG} -n ${NAMESPACE} && \
            kubectl rollout restart deployment/${DEPLOYMENT_NAME} -n ${NAMESPACE}"

workflows:
  version: 2
  build_and_deploy:
    jobs:
      - checkout:
          filters:
            branches:
              only:
                - main
      - build:
          requires:
            - checkout
          filters:
            branches:
              only:
                - main
      - sonar-scan:
          requires:
            - build
          filters:
            branches:
              only:
                - main
      - deploy-to-gke:
          requires:
            - sonar-scan
          filters:
            branches:
              only:
                - main
Thank you for reading my blog, and I hope you find it informative and inspiring. If you have any feedback or questions, please feel free to reach out.